Use Guide - Use
SEE is a web application, so you can use the window's functions in the web-browser, such as Forward, Backward, Print, Save As, Open the Link in A New Window, Copy Text, and Paste Text etc. These things are not introduced here.
To use functions of SEE, your web-browser need:
The following are the general functions in the SEE interfaces:
Tip 1: By sorting and querying, you can find your data records conveniently.
Setup
Tip 2: Before do any operation which will changes data, if you sort them at first, the data will be saved in the current sorting order.
1.4 Interface Setup
User can click the button "Setup" at the bottom of the interface at any time to set the following parameters, which will go into effect immediately and keep in effect in current login:
| Interface Style : | Default Style Beautiful Flowers |
| Interface Theme : | Default Theme |
| Data List Style : | Table Form |
| Page Size : | |
| Default Project : |
They are:
The above parameters can be set in the user's private information too. Two ways have the following differences: the parameters in user's private information will be used at user's every login while parameters in the function "Setup" will be used only at current login, And the modifying in the former will go into effect at user's next login while the modifying in the latter will go into effect immediately.
The following is the default interface theme:
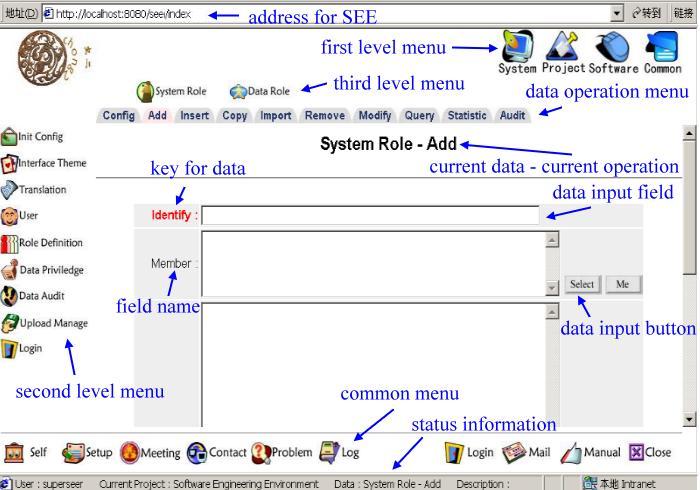
In the middle of interface, pages linked to the function buttons of all levels will be opened. This area is used mainly to show the pages for manufacturing information. On the top of the information manufacturing pages, there is a bar including operation buttons.
In the bottom of the interface, there are some function buttons used usually. They are: user's private information, interface setup, meeting summary, contact way, problem report, working log, login, use guide, logout, contact to the author.
Now only the default theme is provided. User can modify or add some by yourself. Please refer to the "Customing SEE".
Except for the buttons in the top and bottom, user can only see the function buttons which she/he is allowed to use.
At present, there is not any data constraint.
At present, all special strings in SEE are listed as following:
The matrix fileds can be modifed in the batch way.
In the default privilege model, only the super manager and data managers can execute the batch modifying.
A general user can not access the management page of the audit data, but can visit the audit records of a certain information by clicking the button "Audit" on the top of the management page of the corresponding information. That is the audit querying is context-sensitive.
If the current user is not the super manager, any audit record about the super manager will be filtered automatically.
In the audit page, user can select to show audit records list "by data" or "by time".
Problem Report - Audit Click the button "Audit" beside a data line, you will get all audit records about this data:
Problem Report - Audit The following is corresponding audit records:
Problem Report - Audit Click the button "Show" beside a line, you will get all content of this audit record:
Problem Report - Audit The following is corresponding audit records:
In the query page of any information, if current information has any record, a "Export" button will be in the top.
Click the button "Export", the system will pop the following window to let user set the parameters of exporting:
Problem Report - Export The sorting of this exporting will use the same setup of the current page. If html format will be exported, the color and data-style of the current page will be also used. When txt or xml is selected, the following page will be shown:
Problem Report - Export If the charset is not suitable, an error will happen.
Click the button, the system will return the following page: (This example is about the "Problem Report".)
Problem Report - Show Setup Select or maintain the following saved show-setup:
Maintenance
Use Set or add new show-setup directly
In the above page:
If user click the button "OK" at the bottom of the page, the system will return the original information manufacturing page with the effect of the current values of the parameters. User can use this method to set the show parameters temporarily without saving them.
Click the button, the system will return the following page: (This example is about the "Problem Report - Audit".)
Problem Report - Condition Setup Use or maintain one of the following saved query-setups:
Maintenance
Use Set directly or maintain the query-setups Lines in the following tables have the relationship "And", and these tables have the relationship "Or". Or
The following are current base conditions. Whatever Your new conditions are, they will be checked at first. In the top of the page: (If there is no any query-setup saved , these information will not be shown)
If there is no "base condition" in the original page, the information in the bottom of the page will not be shown.
In the above page, use can:
When click "Or" button or "Setup" button, SEE will pop out a window for you to setup the new query condition: (This example is about the "Problem Report".)
Data Audit - Query Setup The following conditions have the relationship "And". In SEE, any comparing or sorting is according to the data type.
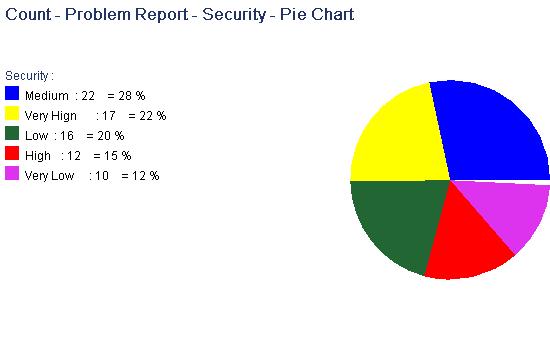
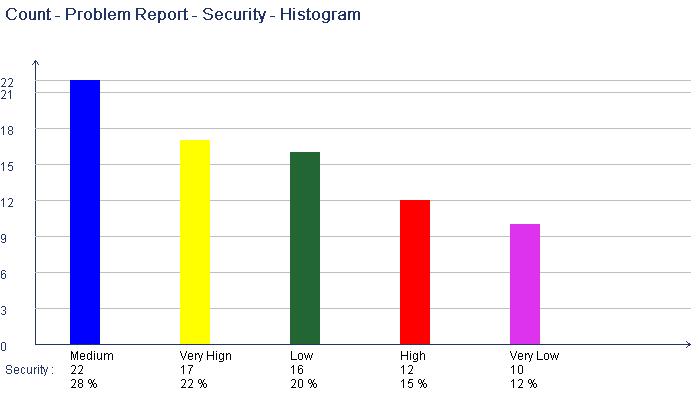
"Count" is that gets numbers and rates of different values of the special data item:
The following is an example setup page of counting: (Counting all values of "Security" automatically)
Problem Report - Statistic The following is the output which is produced automatically:
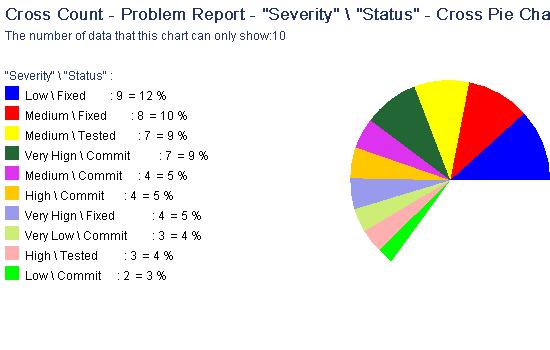
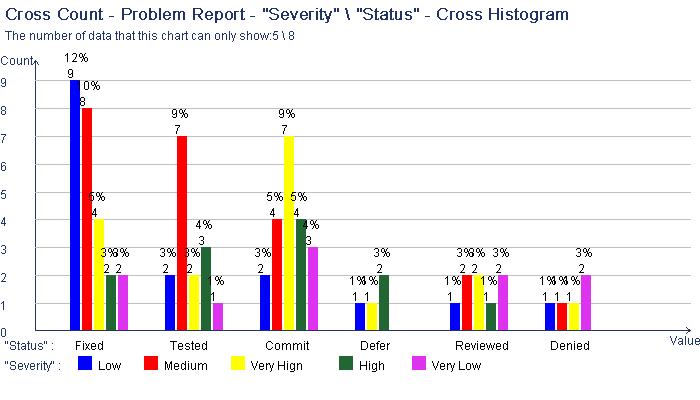
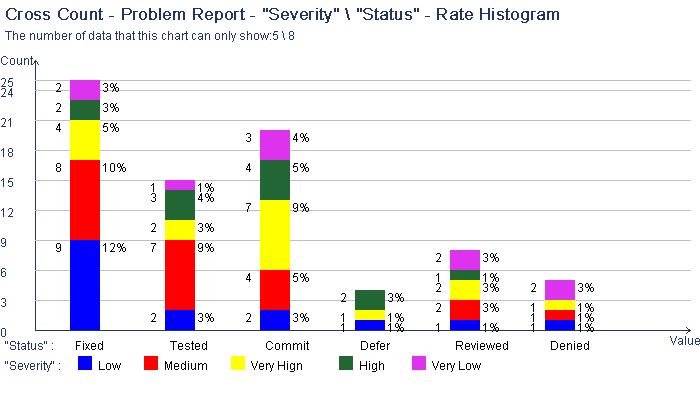
"Cross Count" is that gets numbers and rates of different values of two special data items:
The following is an example setup page of "Cross Count": (Cross counting all values of "Status" and "Security" automatically)
Problem Report - Statistic The following is the output which is produced automatically:
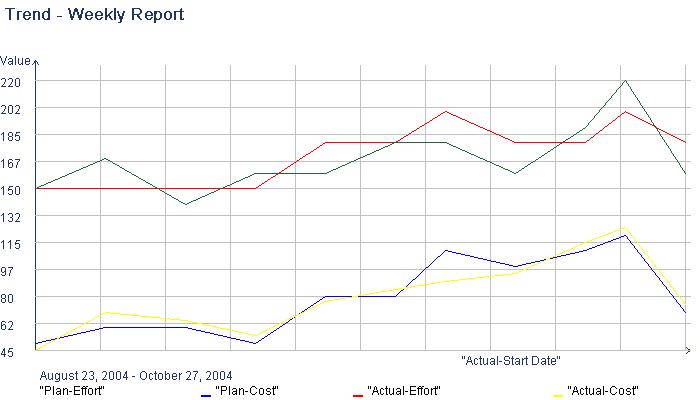
"Trend" is that one chart shows the data's changing with time's going.
The following is an example setup page of trend:
Weekly Report - Statistic The following is an example result page of Trend Chart:
There is always a button "Condition" in the bottom of statistic pages. User can set the conditions to filter data and then make statsitic based on the filtered data.
User can save the conditions and parameters of the current statistic, so that you can use them directly next time.
The management rules of PM are the following:
https://sourceforge.net/projects/chong2see/1.5 Interface Theme
It is how to show the function buttons in the interface in different levels:
The first level (Top) The second level (Left) The third level (Middle top) System Init Config Interface Theme User Role Definition System Role Data Role Data Privilege System Role Acl Data Role Acl Data User Acl Public Data Data Audit Show Setup Condition Setup Statsitic Setup Upload Manage Translation Simlified Chinese Traditional Chinese English Speed Testing Login Project Project Planning Project Register Project Stage Project Task Project Role Risk Analysis Project Tracking Weekly Report Working Log Data Collection Deviation Handling Check List Check Item Check Result Ineligible Item Configuration Code Register Document Register Review Code Review Document Review Software Software Requirement Testing Requirement Testing Procedure Change Request Testing Result Problem Report Common Personal Message Meeting Summary Contact Way Share Resource Information Manual 2 Information Manufacturing in SEE
By selecting the three levels' function menus, user can visit the manufacturing page for some particular information. In the top of the page, there is the following data menu:

2.1 The Data Constraints in SEE
"The Data Constraints" is that the user's data should not include some special chars or strings, which will be filtered automatically.
2.2 The Special Strings in SEE
The special strings are used in SEE to manufacture data.
User had better not use special strings of SEE in your data.
Special String Usage -99999999 Null for integer :c:e:q-c:e:q: "Equal To" in condition :c:n:e-c:n:e: "Not Equal To" in condition :c:g:t-c:g:t: "Greater Than" in condition :c:l:s-c:l:s: "Less Than" in condition :c:s:t-c:s:t: "Start With" in condition :c:e:d-c:e:d: "End With" in condition :c:i:d-c:i:d: "Include" in condition :c:n:i-c:n:i: "Not Include" in condition :m:s-m:s: Splitter for several data :c:i:s-c:i:s: Splitter in condition :c:a:d-c:a:d: "And" in condition :a:a:d-a:a:d: Splitter for statistic SEE-count-total "Total" in statistic. Do not use this as field name. SEE-count-other "Others" in statistic. Do not use this as field name. SEE-count-null "Null" in statistic. Do not use this as field name. see_password_null "Null" for password. Do not use this as password value. see_password_not_modify "Not Modified" for password. Donot use this as password value. :-: Splitter for several values .h.p-h.p. Splitter for name-value of hash :s:m-s:m: Unknown splitter :g:t-g:t: ">" in data will be saved as this string. When show data, ">" is showed. :l:s-l:s: "<" in data will be saved as this string. When show data, "<" is showed. :v:h-v:h: Splitter for value :a:d-a:d: "&" in data will be saved as this string. When show data, "&" is showed. :r:t-r:t: New line in data will be saved as this string. When show data, new line will be added. _aaaa_ Splitter for the matrix field name. User should not use it in your field name. SEE_matrix_value Field name for matrix value. User should not use it as your field name. a:m:s-a:m:s Splitter for audit value 2.3 Adding Data
In the data management page, when click the "Add" page-tab, you will see the page for adding data.
New data will always be added at the end of the current data list.
Refer to section 1.2 to see the notice.
2.4 Inserting Data
In the data management page, when click the "Insert" page-tab, you will see the page for inserting data.
New data will be added before the selected data line.
Refer to section 1.2 and section 1.3 to see the notice.
2.5 Modifying Data
In the data management page, when click the "Modify" page-tab, you will see the page for modifying data.
Refer to section 1.2 and section 1.3 to see the notice.
2.6 Copying Data
In the data management page, when click the "Copy" page-tab, you will see the page for copying data.
The initial values of the new data are just the copy of the values of selected data line.
Refer to section 1.2 and section 1.3 to see the notice.
2.7 Importing Data
In the data management page, when click the "Import" page-tab, you will see the page for importing data.
In the default privilege model, only the super manager and data managers can execute the importing.
Refer to section 4 of the "Manage".
2.8 Removing Data
In the data management page, when click the "Remove" page-tab, you will see the page for removing data.
When click on one data line or click the Remove button before one data line, you can remove this line directly. User can also select several lines to remove.
Below the data lines, the buttons "All in Page" and "All Not" are for selecting the data lines in the current page, and the button "Remove All" is for removing all of data lines, not only lines in the current page.
In the default privilege model, only the super manager and data managers can execute the removing.
Refer to section 1.2 and section 1.3 to see the notice.
2.9 Querying Data
In the data management page, when click the "Query" page-tab, you will see the page for querying data.
In fact, there is also the button "Query Setup" in other pages. The querying page only has the particular button "Export" compared to other pages. And only when there are some data lines, this button will be shown. Refer to section 4 to see more about exporting.
Refer to section 1.2 and section 1.3 to see the notice.
Refer to section 6 to see more about query-setup.
When data is matrix table, there will be a selection in the top of the page for user to switch between main data and matrix data.
2.10 Statistic
In the data management page, when click the "Statistic" page-tab, you will see the page for statistic.
Now "Count", "Cross Count" and "Trend" types of statistic methods are provided.
The produced pictures are in jpg format. They are temporary files and system will delete them after 5 minutes.
Refer to section 7 to see more about statistic.
The trend tab will be shown only when the information has some date/time field(s) as well as number (integer/float) field(s).
2.11 Batch Modification
In the data management page, when click the "Batch Modify" page-tab, you will see the page for batch modifying data.
Two steps will be needed. The first step is selecting the data to be modified, and the second step is inputing the values to be updated.
Single keyword and password fileds can not be modified in the batch way.
Below the data lines, the buttons "All in Page" and "All Not" are for selecting the data lines in the current page, and the button "Modify All" is for modifying all of data lines, not only lines in the current page.
Refer to section 1.2 and section 1.3 to see the notice.
3 Data Audit in SEE
3.1 Querying the Audit Data
In the default privilege model, all of general users can query the audit records.
For example, in the management page of the "Problem Report", click the button "Audit", then the system will list all audit records about the "Problem Report".
3.2 Showing Audit Records by Data List
"By data" to show audit record, is that the system lists information's data and user selects a data to show all audit records about this data. An example is following:
By Data
By Time
Status:
Reviewed
Fixed
Commit
Closed
Denied
Tested
Defer
Others
-
Project
Type
Object
Status
Security
Priority
Title
Assigned to
Last Changed Time

-
Bug
Code
Denied
Medium
Medium
try
-
May 3, 2004 2:57:23 PM CST
-
Bug
Code
Commit
Medium
Medium
lulu
-
May 3, 2004 2:57:46 PM CST
Total Count : 2 Current Number : 1 - 2
Every Page :
 Jump to Page :


Style:Table
Item:[Project, Type, Object, Status, Security, Priority, Title, Assigned to, Last Changed Time]
Identify :
May 3, 2004 2:57:36 PM CST-superseer
Data :
Problem Report
Operation :
Modify
Keys :
{Configuration Code=PR-s}
Old Values :
{Status=Commit, Last Changed Time=May 3, 2004 2:56:22 PM CST}
New Values :
{Status=Denied, Last Changed Time=May 3, 2004 2:57:23 PM CST, Comment=r}
Who :
superseer
When :
May 3, 2004 2:57:36 PM CST
Where :
127.0.0.1
Result :
Successful
Identify :
May 3, 2004 2:56:51 PM CST-superseer
Data :
Problem Report
Operation :
Add
Keys :
{Configuration Code=PR-s}
Old Values :
{Description=r, Commit Time=May 3, 2004 2:56:22 PM CST, Type=Bug, Reporter=superseer, Last Changed Time=May 3, 2004 2:56:22 PM CST, Configuration Code=PR-s, Priority=Medium, Security=Medium, Title=try, Object=Code, Status=Commit, Last Changed Person=superseer, Commit Person=superseer}
New Values :
Who :
superseer
When :
May 3, 2004 2:56:51 PM CST
Where :
127.0.0.1
Result :
Successful
3.3 Showing Audit Records by Time
"By time" to show audit record, is that the sytem lists audit records according to time. An example is following:
By Data
By Time
-
Data
Operation
Who
When
Where
Result

Problem Report
Remove
superseer
May 3, 2004 3:07:12 PM CST
127.0.0.1
Successful
Problem Report
Add
superseer
May 3, 2004 2:57:57 PM CST
127.0.0.1
Successful
Problem Report
Modify
superseer
May 3, 2004 2:57:36 PM CST
127.0.0.1
Successful
Problem Report
Add
superseer
May 3, 2004 2:56:51 PM CST
127.0.0.1
Successful
Total Count : 4 Current Number : 1 - 4
Every Page :
Jump to Page :
Style:Table
Item:[Data, Operation, Who, When, Where, Result]
Identify :
May 3, 2004 2:57:36 PM CST-superseer
Data :
Problem Report
Operation :
Modify
Keys :
{Configuration Code=PR-s}
Old Values :
{Status=Commit, Last Changed Time=May 3, 2004 2:56:22 PM CST}
New Values :
{Status=Denied, Last Changed Time=May 3, 2004 2:57:23 PM CST, Comment=r}
Who :
superseer
When :
May 3, 2004 2:57:36 PM CST
Where :
127.0.0.1
Result :
Successful
4 Data Exporting in SEE
If want to store data, please select the All Items
To html format, UTF-8 is always used and the setup of charset does not work.
Format
txt
xml
html
Data
All
Current
Items
All
Current
Charset
iso-8859-1
gb2312
big-5
UTF-8
This is a temporary file. System will delete it in 5 minutes. So please open or save it in time.

Save as UTF-8 will always success.
5 Show-setup in SEE
In the data list page of any information, there is button "Show-Setup".
By type
By object
Title:

Current Show Setup:By object


Show Item
Configuration Code
Project
Title
Status
Type
Object
Security
Priority
Description
Assigned to
Reporter
Comment
Commit Person
Commit Time
Last Changed Person
Last Changed Time

Sort Item
Configuration Code
Project
Title
Status
Type
Object
Security
Priority
Description
Assigned to
Reporter
Comment
Commit Person
Commit Time
Last Changed Person
Last Changed Time
Null Order
Ascending
Descending
Color
Configuration Code
Project
Title
Status
Type
Object
Security
Priority
Description
Assigned to
Reporter
Comment
Commit Person
Commit Time
Last Changed Person
Last Changed Time
Value
Color
Others
Data List Style
Table
Form
FFDDDD
FFDD99
FFFF99
DDFFDD
DDFFFF
DDDDFF
FFDDFF
EEEEEE
6 Condition Setup in SEE
In the data list page of any information, there is button "Condition".
cond1
cond2
Title:
Current Query Setup:cond2
Item
operator
Value
Status
Equal To
Fixed
Last Changed Time
Less Than
July 8, 2004 7:41:39 PM CST
Item
operator
Value
Status
Equal To
Tested
Item
operator
Value
Data
Equal To
Problem Report
When use the operator "Greater Than" or "Less Than ", data will be compared according to their types, such as date, time, integer, and string.
Configuration Code
operator :
Equal To
Not Equal To
Greater Than
Less Than
Start With
End With
Include
Not Include
Value :
Project
operator :
Equal To
Not Equal To
Greater Than
Less Than
Start With
End With
Include
Not Include
Value :
Title
operator :
Equal To
Not Equal To
Greater Than
Less Than
Start With
End With
Include
Not Include
Value :
Status
operator :
Equal To
Not Equal To
Greater Than
Less Than
Start With
End With
Include
Not Include
Value :
Commit
Reviewed
Fixed
Tested
Closed
Defer
Denied
Type
operator :
Equal To
Not Equal To
Greater Than
Less Than
Start With
End With
Include
Not Include
Value :
Bug
Advice
User Feedback
Enhancement
Not Implemented
Object
operator :
Equal To
Not Equal To
Greater Than
Less Than
Start With
End With
Include
Not Include
Value :
Code
Database
Data
Testing
Design
Requirement
Document
Security
operator :
Equal To
Not Equal To
Greater Than
Less Than
Start With
End With
Include
Not Include
Value :
Very Hign
High
Medium
Low
Very Low
Priority
operator :
Equal To
Not Equal To
Greater Than
Less Than
Start With
End With
Include
Not Include
Value :
Very Hign
High
Medium
Low
Very Low
Description
operator :
Equal To
Not Equal To
Greater Than
Less Than
Start With
End With
Include
Not Include
Value :
Assigned to
operator :
Equal To
Not Equal To
Greater Than
Less Than
Start With
End With
Include
Not Include
Value :
Reporter
operator :
Equal To
Not Equal To
Greater Than
Less Than
Start With
End With
Include
Not Include
Value :
Comment
operator :
Equal To
Not Equal To
Greater Than
Less Than
Start With
End With
Include
Not Include
Value :
Attachment
operator :
Equal To
Not Equal To
Greater Than
Less Than
Start With
End With
Include
Not Include
Value :
Commit Person
operator :
Equal To
Not Equal To
Greater Than
Less Than
Start With
End With
Include
Not Include
Value :
Commit Time
operator :
Equal To
Not Equal To
Greater Than
Less Than
Start With
End With
Include
Not Include
Value :
Last Changed Person
operator :
Equal To
Not Equal To
Greater Than
Less Than
Start With
End With
Include
Not Include
Value :
Last Changed Time
operator :
Equal To
Not Equal To
Greater Than
Less Than
Start With
End With
Include
Not Include
Value :
For example, to "123" and "23", if compare them as string type, "23" is greater than "123", and if compare them as integer type, "123" is greater than "23".
7 Statistic in SEE
7.1 Count

Count


Cross Count

Count Item
Configuration Code
Project
Title
Status
Type
Object
Security
Priority
Description
Assigned to
Reporter
Comment
Attachment
Commit Person
Commit Time
Last Changed Person
Last Changed Time
Value
Input values which will be counted, split them by ":-:". If need system count all values automatically, donnot input anything.
Image
Pie Chart
Histogram
Security
Count
Rate
Medium
22
28.57 %
Very High
17
22.07 %
Low
16
20.77 %
High
12
15.58 %
Very Low
10
12.98 %
Total Count
77
100 %
7.2 Cross Count
Count
Cross Count
Cross Count Item
Configuration Code
Project
Title
Status
Type
Object
Security
Priority
Description
Assigned to
Reporter
Comment
Attachment
Commit Person
Commit Time
Last Changed Person
Last Changed Time
Value
Input values which will be counted, split them by ":-:". If need system count all values automatically, do not input anything.
Cross Item
Configuration Code
Project
Title
Status
Type
Object
Security
Priority
Description
Assigned to
Reporter
Comment
Attachment
Commit Person
Commit Time
Last Changed Person
Last Changed Time
Value
Input values which will be counted, split them by ":-:". If need system count all values automatically, do not input anything.
Image
Cross Pie Chart
Cross Histogram
Rate Histogram
Show Value :
Yes
No
Security \ Status
Fixed
Tested
Commit
Defer
Reviewed
Denied
Total Count
Rate
Low
9
2
2
1
1
1
16
20.77 %
Medium
8
7
4
0
2
1
22
28.57 %
Very Hign
4
2
7
1
2
1
17
22.07 %
High
2
3
4
2
1
0
12
15.58 %
Very Low
2
1
3
0
2
2
10
12.98 %
Total Count
25
15
20
4
8
5
77
100.00 %
Rate
32.46 %
19.48 %
25.97 %
5.19 %
10.38 %
6.49 %
100%
7.3 Trend
So the trend tab will be shown only when the information has some date/time field(s) as well as number (integer/float) field(s).
Count
Cross Count
Trend
Trend Time
Commit Time
Last Changed Time
Plan-Start Date
Plan-End Date
Actual-Start Date
Actual-End Date
Value
Plan-Staff Number
Plan-Size
Plan-Effort
Plan-Cost
Actual-Staff Number
Actual-Size
Actual-Effort
Actual-Cost
Start Time
If want to use the earliest time, please do not input anything.
End Time
If want to use the latest time, please do not input anything.
"Actual-Start Date"
"Plan-Effort"
"Plan-Cost"
"Actual-Effort"
"Actual-Cost"
August 23, 2004
50
150
45
150
August 30, 2004
60
150
70
170
September 7, 2004
60
150
65
140
September 14, 2004
50
150
55
160
September 21, 2004
80
180
77
160
September 28, 2004
80
180
85
180
October 3, 2004
110
200
90
180
October 10, 2004
100
180
95
160
October 17, 2004
110
180
115
190
October 21, 2004
120
200
125
220
October 27, 2004
70
180
75
160
7.4 Condition Setup for Statistic
Refer to section 6 to see how to setup conditions.
7.5 Saving the Statistic Setup
Please refer to Show-Setup or Condition Setup. The setups of statistic can also be added, modified and removed.
8 Personal Message
Software Engineering Environment Version 0.07/2004-12